How to Draw a Black Panther: Step-by-Step Tutorial
Welcome to your comprehensive guide on how to draw a black panther, the sleek and mysterious big cat that's captivating audiences worldwide thanks to the Marvel Cinematic Universe. With its stealthy moves and powerful presence, drawing a black panther can be a rewarding artistic challenge. Let's get started!
affiliates ( polymers, aromatics, , and , to name a few. This guide will focus on representational art, limiting the discussion to essential elements and a basic process for beginners. So, grab your pencils, and let's embark on this artistic journey together!
Understanding the Black Panther's Anatomy
Before you start drawing, it's crucial to understand the black panther's anatomy. This majestic creature is a black leopard, a melanistic variant of the leopard found in jungles and forests across Asia and Africa.


Key features include:
- Dark, almost black fur, often with faint speckles of rust or gold (unless you're drawing Marvel's version, which is entirely black)
- Powerful, muscular body build
- Large paws with sharp claws
- Reddish or golden eyes
- Long, agile tail
Proportions and Structure
Like all big cats, black panthers have a strong, streamlined body. To capture their essence, focus on the following proportions:


- Head: Around one-sixth of the body's total length
- Legs: About half the torso's length
- Tail: About as long as the head and body combined
References and Sketching
Before you commit to final lines, gather reference images of black panthers. Look for photos showcasing various poses, facial expressions, and lighting conditions. Sketch lightly, using the reference to capture the cat's essence withoutcopying it directly.
Experimentation is key here. Try different layouts, angles, and compositions until you find the one that resonates with you. Remember, the goal is to understand and convey the subject, not replication.
Drawing the Black Panther's Form
Once you've sketched a basic layout, it's time to refine your drawing. Start by establishing the black panther's core structure using basic shapes and lines.


Here's a step-by-step guide to help you:
Basic Shapes
Begin by drawing a large circle for the head. Below it, create an oval for the torso, and a smaller oval for the crouching or standing legs. Sketch a wavy, banana-like curve for the tail.
Next, add two long, curved lines for the neck and two more for the spine. Draw two smaller circles for the hips and two ovals for the shoulders. Finally, add two short lines for the knees and another two for the ankles.


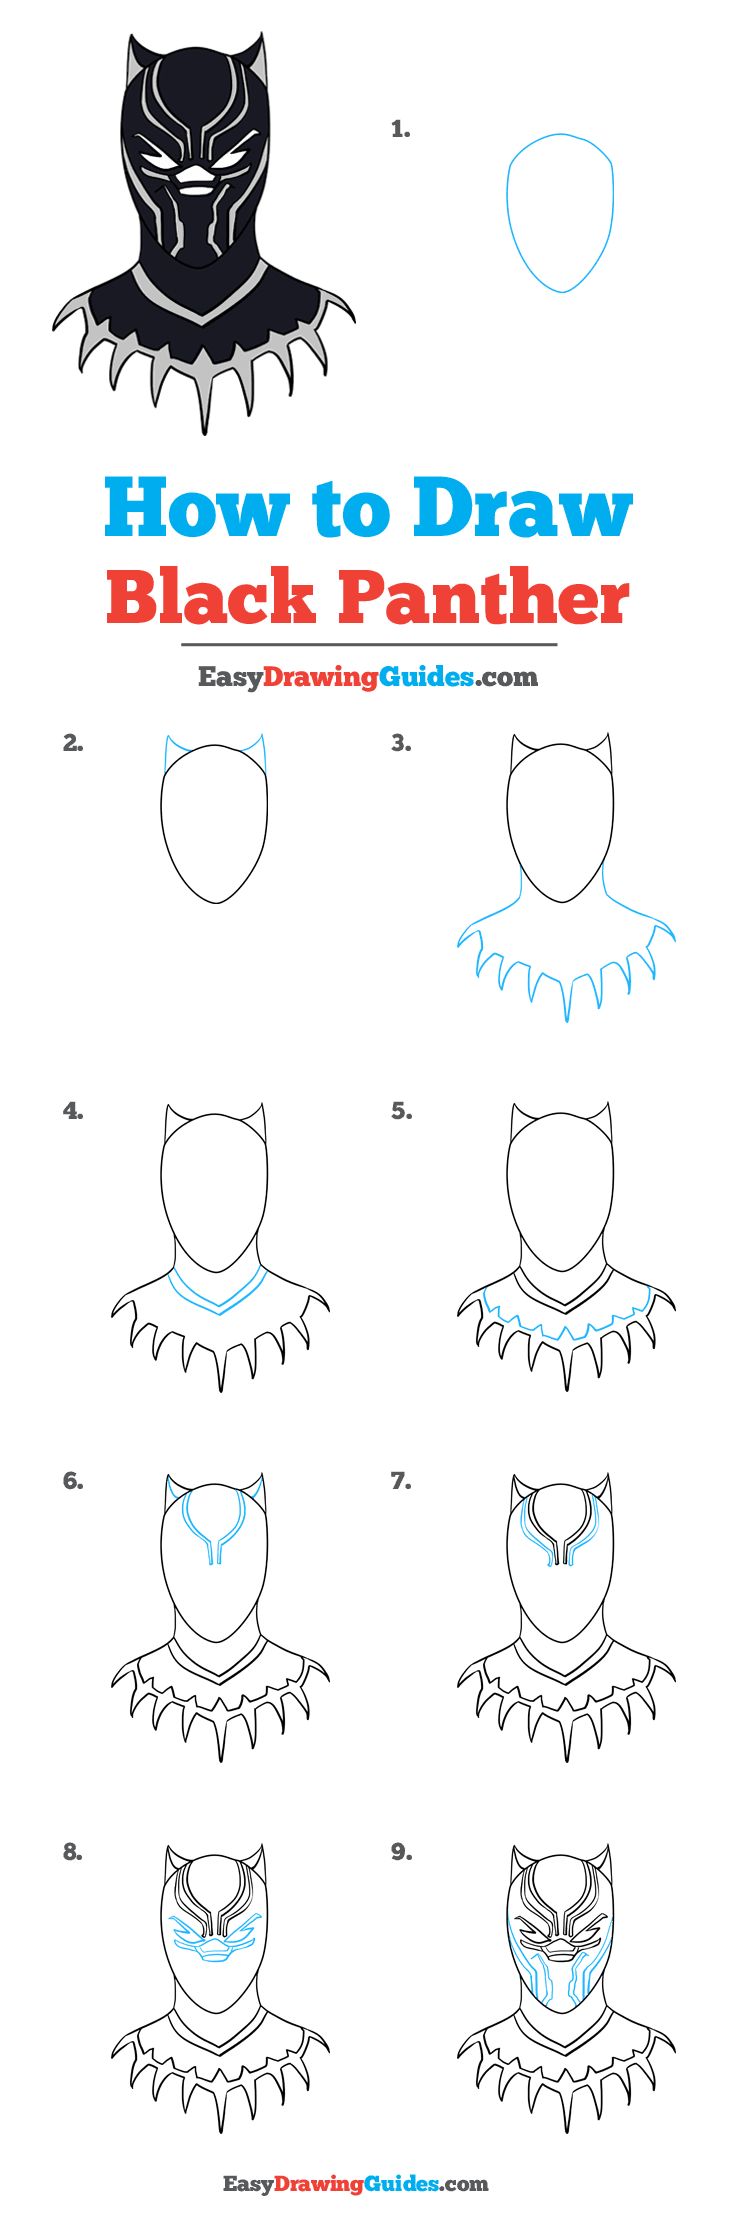

Refining the Shape
Use these basic shapes as a foundation. Refine and adjust them to better match the anatomy and proportions you want to capture. For instance, make the legs and paws bigger and more powerful, and the head larger and more domed.
Don't forget to add details like the panther's distinctive muzzle, ears, and whiskers. The key here is to keep your lines confident and flowing, maintaining a sense of volume and life in your drawing.
Adding Detail and Shading
Now that you have the black panther's basic form established, it's time to add details and create depth through shading.
Here's how to approach it:
Details
Look back at your reference images and start adding details like fur patterns, speckles, or distinctive black panther features. Draw the eyes, nose, mouth, and other facial features. Add the sharp claws and any distinctive poses or movements.
For Marvel's black panther, Wakandan robes, jetpacks, or vibranium weapons may be relevant. Use your imagination, but avoid excessive detail that might clutter your drawing.
Shading
To create the illusion of three-dimensional depth, add shading to your drawing. Since black panthers are mostly dark, start by lightly shading the extreme darks using a 2B or 4B pencil. Focus on the deepest, most shadowed areas like the undersides of the legs, belly, and muzzle.
Next, use a blending stump or tissue to smudge the shading, creating a smooth gradient from dark to light. Add more layers of shading and highlights to enhance the contrast and depth. For Marvel's black panther, you'll need to build up stark contrast to create the hyper-realistic effect.
Final Touches
Once you're happy with your shading and details, it's time for final touches. Lightly erase any remaining visible construction lines. Darken any areas that need more contrast, and add any final, delicate details.
Consider adding a background to place your black panther in context. This could be a habitat like a dense jungle or a futuristic Wakandan cityscape. Don't overpower your panther, though—it's the star of the show!
Congratulations, you've just mastered the art of drawing a black panther! Share your creations online, and don't forget to tag us to have a chance to be featured. Happy drawing, and until next time!
Related Articles
How to Draw a Black Panther: Step-by-Step Tutorial
Embarking on a creative journey to draw the enigmatic Black Panther, the alter ego of Marvel's iconic superhero, can be both exciting and rewarding. This...

Mastering Panther Art: Step-by-Step Drawing Tutorial
tracing a black panther with sleek lines and smoldering eyes can be a captivating artistic challenge. This graceful and elusive big cat is an enthralling...

How to Draw a Panther in 2019: Step-by-Step Tutorial
The year 2019 brought us many exciting developments in the digital world, one of which was the release of Draw Panther, a groundbreaking illustration software...

Master Black Panther Drawing: Step-by-Step Guide
Are you a Marvel fan dreaming of drawing Black Panther but intimidated by his intricate detail? Don't worry, with our step-by-step guide, you'll soon be...

Mastering Seagull Flight: A Step-by-Step Drawing Tutorial
Have you ever marveled at the fluid dance of seagulls gliding through the skies, their wings slicing effortlessly through the breeze? Capturing this dynamic...

Draw Batman & Joker: Step-by-Step Tutorial
The allure of drawing iconic comic characters like Batman and The Joker is undeniable. With their distinct features and intimidating presence, mastering these...